Build an AI Workflow
Building a Christmas Dinner RAG workflow with StepKit
This tutorial will guide you through building an AI workflow using the StepKit Inngest client with Express. By the end, you'll understand how to create intelligent, agentic workflows that combine retrieval and generation (RAG pattern).
Example available on GitHub
Open this Christmas Dinner RAG example on GitHub while reading the tutorial.
Our Christmas Dinner RAG workflow
- Searches recipes based on cuisine preferences
- Analyzes dietary restrictions using AI
- Conditionally fetches ingredient alternatives (agentic behavior!)
- Generates elegant menus using the RAG pattern
- Creates organized shopping lists
Prerequisites
- Node.js 18+ installed
- Basic TypeScript knowledge
- OpenAI API key (get one here)
- 10 minutes of your time
Part 1: Project setup
Step 1: Create your project
mkdir christmas-dinner-workflow
cd christmas-dinner-workflow
npm init -y
Step 2: Install dependencies
npm install @stepkit/core @stepkit/inngest inngest express dotenv openai zod
npm install -D typescript tsx @types/express @types/node
What we installed:
@stepkit/core+@stepkit/inngest: The StepKit frameworkinngest: Workflow execution engineexpress: Web serveropenai: For AI generationzod: Runtime type validation
Step 3: Create configuration files
Create tsconfig.json:
{
  "compilerOptions": {
    "target": "ES2022",
    "module": "commonjs",
    "lib": ["ES2022"],
    "outDir": "./dist",
    "rootDir": "./",
    "strict": true,
    "esModuleInterop": true,
    "skipLibCheck": true,
    "forceConsistentCasingInFileNames": true
  },
  "include": ["./**/*"],
  "exclude": ["node_modules"]
}
Create .env:
OPENAI_API_KEY=sk-your-key-here
PORT=3000
Part 2: Building the workflow
Step 4: Create the StepKit client
Create client.ts:
import { Client } from "@stepkit/inngest";

export const client = new Client({
  id: "christmas-dinner-rag",
});
Key concept: The client is your entry point to StepKit. It manages workflow registration and execution.
Step 5: Set up OpenAI
Create openai.ts:
import OpenAI from "openai";

let openaiInstance: OpenAI | null = null;

export function getOpenAI(): OpenAI {
  if (openaiInstance) {
    return openaiInstance;
  }

  const apiKey = process.env.OPENAI_API_KEY;
  if (!apiKey) {
    throw new Error("OPENAI_API_KEY is required");
  }

  openaiInstance = new OpenAI({ apiKey });
  return openaiInstance;
}
Step 6: Create sample data
For this tutorial, we'll use in-memory data. Create data.ts:
Note: We're keeping data separate from business logic for better organization.
export interface Recipe {
  name: string;
  cuisine: string;
  description: string;
  ingredients: string[];
  instructions: string;
}

export const RECIPES: Recipe[] = [
  {
    name: "Classic Roast Turkey",
    cuisine: "American",
    description: "Traditional roasted turkey with herbs and butter",
    ingredients: ["whole turkey", "butter", "rosemary", "thyme", "garlic"],
    instructions:
      "Preheat oven to 325°F. Rub turkey with herb butter. Roast for 3-4 hours.",
  },
  {
    name: "Herb Crusted Lamb",
    cuisine: "French",
    description: "Rack of lamb with herb and breadcrumb crust",
    ingredients: [
      "rack of lamb",
      "breadcrumbs",
      "parsley",
      "garlic",
      "dijon mustard",
    ],
    instructions:
      "Coat lamb with mustard and herb breadcrumbs. Roast at 400°F for 20-25 minutes.",
  },
  // Add more recipes as needed
];

export function searchRecipesByCuisine(cuisine: string, limit = 3): Recipe[] {
  const cuisineLower = cuisine.toLowerCase();
  return RECIPES.filter((recipe) =>
    recipe.cuisine.toLowerCase().includes(cuisineLower)
  ).slice(0, limit);
}
Step 7: Create business logic services
Let's separate our business logic from workflow orchestration. Create services.ts:
import { getOpenAI } from "./openai";
import type { Ingredient, Recipe } from "./data";

/**
 * Analyzes dietary restrictions using OpenAI to extract allergens
 */
export async function analyzeDietaryRestrictions(
  restrictions: string
): Promise<string[]> {
  const openai = getOpenAI();

  const response = await openai.chat.completions.create({
    model: "gpt-4o-mini",
    messages: [
      {
        role: "system",
        content:
          "Extract allergens from text. Return JSON with 'allergens' array.",
      },
      {
        role: "user",
        content: `Extract allergens: "${restrictions}"`,
      },
    ],
    response_format: { type: "json_object" },
  });

  const parsed = JSON.parse(response.choices[0]?.message?.content || "{}");
  return parsed.allergens || [];
}

/**
 * Generates menu description using OpenAI (RAG pattern)
 */
export async function generateMenuDescription(
  recipes: Recipe[],
  participants: number,
  alternatives?: Map<string, string[]>
): Promise<string> {
  const openai = getOpenAI();

  // Prepare recipe context from retrieved data
  const recipeContext = recipes
    .map(
      (r) =>
        `${r.name}: ${r.description}. Ingredients: ${r.ingredients.join(", ")}`
    )
    .join("\\n\\n");

  const response = await openai.chat.completions.create({
    model: "gpt-4o-mini",
    messages: [
      {
        role: "system",
        content: `Create an elegant Christmas dinner menu for ${participants} guests.`,
      },
      {
        role: "user",
        content: `Create a menu using these recipes:\\n\\n${recipeContext}`,
      },
    ],
  });

  return response.choices[0]?.message?.content || "Menu generation failed";
}

/**
 * Creates organized shopping list using OpenAI
 */
export async function createShoppingList(
  recipes: Recipe[],
  participants: number,
  alternatives?: Map<string, string[]>
): Promise<string> {
  // Implementation similar to above
  // ... (see full code in repository)
}

/**
 * Builds ingredient alternatives map
 */
export function buildAlternativesMap(
  alternatives: Ingredient[]
): Map<string, string[]> {
  const map = new Map<string, string[]>();
  alternatives.forEach((ingredient) => {
    map.set(ingredient.name, ingredient.alternatives);
  });
  return map;
}
Key concept: Separating business logic from workflow orchestration makes your code:
- More testable: You can unit test services independently
- More maintainable: Business logic changes don't affect workflow structure
- More reusable: Services can be used in multiple workflows
Step 8: Build the workflow
Now for the exciting part! Create workflow.ts:
import { z } from "zod";
import { client } from "./client";
import { searchRecipesByCuisine, searchIngredientsByAllergen } from "./data";
import {
  analyzeDietaryRestrictions,
  buildAlternativesMap,
  generateMenuDescription,
} from "./services";

// Define input schema with Zod for type safety and validation
const DinnerPlanInput = z.object({
  participants: z.number().min(1).max(20),
  cuisinePreference: z.string(),
  dietaryRestrictions: z.string().optional(),
});

export const christmasDinnerWorkflow = client.workflow(
  {
    id: "christmas-dinner-planner",
    inputSchema: DinnerPlanInput,
  },
  async (ctx, step) => {
    // Access validated input
    const { participants, cuisinePreference, dietaryRestrictions } =
      ctx.input.data;

    console.log(
      `🎅 Planning dinner for ${participants} guests with ${cuisinePreference} cuisine`
    );

    // STEP 1: Retrieve recipes from knowledge base
    const recipes = await step.run("query-recipes", async () => {
      console.log(`🔍 Searching for ${cuisinePreference} recipes...`);
      return searchRecipesByCuisine(cuisinePreference, 3);
    });

    // STEP 2: Use AI to analyze dietary restrictions
    const detectedAllergens = await step.run(
      "analyze-restrictions",
      async () => {
        if (!dietaryRestrictions) return [];

        console.log(
          `🔍 Analyzing dietary restrictions: "${dietaryRestrictions}"`
        );
        const allergens = await analyzeDietaryRestrictions(dietaryRestrictions);

        if (allergens.length > 0) {
          console.log(`⚠️ Detected allergens: ${allergens.join(", ")}`);
        }

        return allergens;
      }
    );

    // STEP 3: Conditionally fetch alternatives (Agentic pattern!)
    let ingredientAlternatives = undefined;
    if (detectedAllergens.length > 0) {
      const alternatives = await step.run("fetch-alternatives", async () => {
        console.log("🔄 Fetching ingredient alternatives...");
        const allAlternatives = [];

        for (const allergen of detectedAllergens) {
          const results = searchIngredientsByAllergen(allergen, 5);
          allAlternatives.push(...results);
        }

        return allAlternatives;
      });

      ingredientAlternatives = buildAlternativesMap(alternatives);
    }

    // STEP 4: Generate menu using RAG pattern
    const menu = await step.run("generate-menu", async () => {
      console.log("📝 Generating menu with OpenAI...");
      return await generateMenuDescription(
        recipes,
        participants,
        ingredientAlternatives
      );
    });

    console.log("\\n" + menu);

    return {
      success: true,
      menu,
      recipes: recipes.length,
      allergensDetected: detectedAllergens.length,
    };
  }
);
Key concepts explained:
- Separation of Concerns: Notice how clean the workflow is! All business logic (OpenAI calls, data processing) lives in
services.ts. The workflow only orchestrates the steps. step.run(): Each step is isolated and retryable. If a step fails, it automatically retries without re-running previous steps.- Agentic Pattern (lines with
if (detectedAllergens.length > 0)): The workflow makes intelligent decisions based on runtime data. Step 3 only runs when needed! - RAG Pattern (Step 4): We retrieve factual data (recipes) in Step 1, then use AI to generate creative output grounded in that data in Step 4. This prevents hallucination!
Step 9: Create the Express server
Create main.ts:
import "dotenv/config";
import express from "express";
import { serve } from "inngest/express";
import { inngestify } from "@stepkit/inngest";
import { client } from "./client";
import { christmasDinnerWorkflow } from "./workflow";

const app = express();
app.use(express.json());

// Mount Inngest endpoint
app.use("/api/inngest", serve(inngestify(client, [christmasDinnerWorkflow])));

const PORT = process.env.PORT ?? 3000;

app.listen(PORT, () => {
  console.log(`🎅 Server running on <http://localhost>:${PORT}`);
  console.log(`📡 Inngest endpoint: <http://localhost>:${PORT}/api/inngest`);
});
Step 10: Add npm scripts
Update your package.json:
{
  "scripts": {
    "dev": "tsx --watch main.ts",
    "inngest:devserver": "npx inngest-cli@latest dev -u <http://localhost:3000/api/inngest>"
  }
}
Part 3: Testing your workflow
Step 11: Start your application
Open two terminal windows:
Terminal 1 - Start your Express server:
npm run devTerminal 2 - Start the Inngest Dev Server:
npm run inngest:devserverThis launches a local development UI at http://localhost:8288.
Step 12: Trigger your workflow
Open your browser to http://localhost:8288.
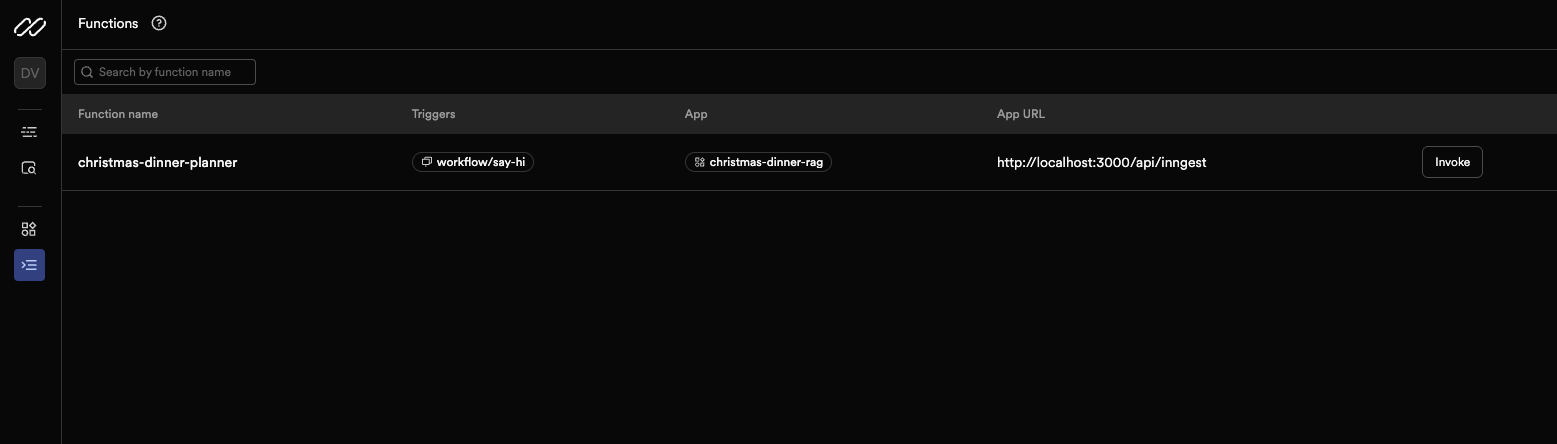
- Click on the
christmas-dinner-plannerworkflow - Click the "Invoke Function" button
- Paste this JSON payload:
{
  "participants": 6,
  "cuisinePreference": "French",
  "dietaryRestrictions": "gluten-free, no dairy"
}
- Click "Invoke"
Step 13: Inspect your workflow run
Watch the magic happen! You'll see:
- Function Runs: Each execution appears in the timeline
- Step-by-step execution: Click into a run to see each step
- Output logs: See console.log outputs from each step
- Timing information: How long each step took
- Retry history: If any step failed and was retried
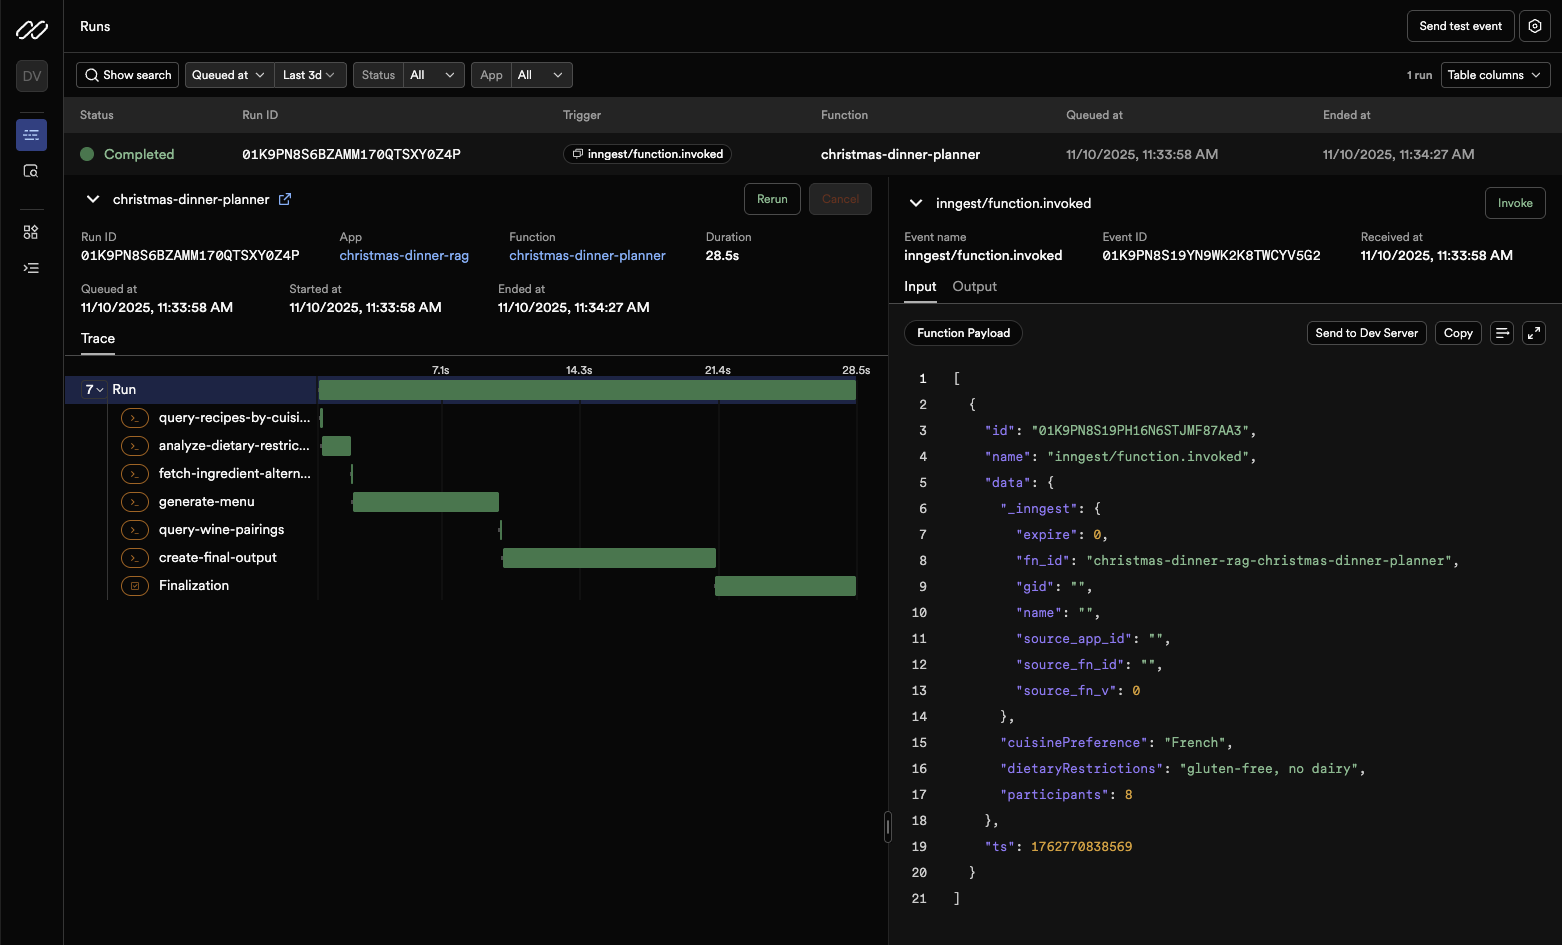
Notice something cool?
- Look at step 3 ("fetch-alternatives") - it only ran because we specified dietary restrictions
- Check the logs - you'll see the AI detected "gluten" and "dairy" from our input
- The menu uses the retrieved recipes as context
This is the agentic pattern in action!
Conclusion
Congratulation!
By building this AI workflow with StepKit, you practiced the following patterns:
Durable Execution
StepKit’s durable execution engine ensures that our AI workflow runs to completion, no matter the issues faced along the way (network issues or 3rd-party API outages, etc).
Try this experiment:
- Add a
throw new Error("Oops!")in one of your steps - Trigger the workflow again
- Watch Inngest automatically retry the failed step
Your previous successful steps don't re-run. This is durable execution - perfect for expensive operations like AI calls!
The Agentic Pattern
Our workflow makes intelligent decisions:
if (detectedAllergens.length > 0) {
  // Only fetch alternatives when needed
  alternatives = await step.run("fetch-alternatives", async () => {
    // Expensive operation only runs conditionally
  });
}
This is different from static workflows. Your workflow adapts based on runtime conditions, just like an intelligent agent!
Next steps
Enhance your workflow:
- Connect to a real vector database (Weaviate, Pinecone)
- Add more conditional logic based on AI outputs
- Implement streaming for real-time updates
- Add error handling and custom retry logic
Deploy to production:
- Push to GitHub
- Deploy to Railway/Render/Vercel
- Configure Inngest Cloud for production workflows
- Monitor with built-in observability